 If you want to make a few bucks from all the hard work you are putting into your blog then consider adding a Paypal donate button to your Blogger Blogspot blog. Adding a donation button will encourage all those happy readers to say a big thank you for helping them out. Not everyone will donate but you will get the odd generous soul who will willingly donate some chump change to shout you a coffee.
In this tutorial we will be adding a gadget to the Blogger sidebar but we won't be changing the template.
1. Get yourself a Paypal account if you don't already have one.
2. Login to your Paypal account.
3. Click on the Merchant Services tab.

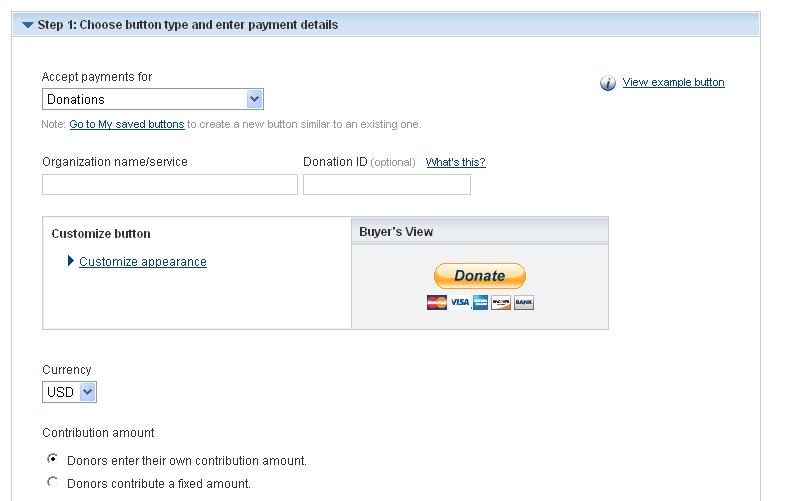
4. Choose Donations from the list of key features displayed in the right sidebar of the PayPal Website Payments Standard Option (first of 3 payment solutions).

5. From the Paypal Create a Payment Button screen choose Donation from the dropdown menu at Step 1. if it is not already selected.
6. Stick with the default button unless you wish to customize it.
7. Choose your currency depending on your needs and location.
8. Choose Donors enter their own contribution amount radio button unless you want to have a set amount.
9. Ensure the Secure Merchant ID radio button is selected. This will prevent spammers getting hold of your email address.
10. At Step 2 it is worth saving your button.
11. At Step 3 Customize your checkout page by allowing donors to write a short comment by selecting the Yes radio button to special instructions to seller.
12. Select the No radio button for Customer's Shipping Address.
13. Select the Create Button button.
14. Once Paypal creates the donate button code copy it by right clicking your mouse and choosing copy.
15. Logout of Paypal.
16. Login to Blogger if you are not already logged in.
17. Go to Layout > Page Elements.
18. Click on the Add a Gadget link in the sidebar.
19. Choose HTML/Javascript widget from the list provided.
20. Paste the button code into the Content box of the dialog box that appears by placing the mouse inside the box and right clicking the mouse and then paste.
21. Select a title like "Shout Me a Coffee Today!" or whatever you would like.
22. Click on the Save button.
23. Drag and drop your new donation gadget into the spot you want it to appear in.
24. Click the Save button to ensure your changes are saved.
25. Click View Blog to see your new donate button in the sidebar of your Blogger blog.
26. Click on your new donate button and you will be taken to the Paypal Checkout screen.

This tutorial has walked you through the steps needed to add a Paypal donate button to your Blogger Blogspot blog.
credit to blogknowhow.blogdpot.com


No comments:
Post a Comment